- Asset Management
- Automated Password Reset
- Billing and Invoicing
- Change Management
- Contract Management
- Customer Survey
- Incident, Problem, or Request Management
- ITIL Compliant
- Knowledge Base/FAQ
- LDAP/Active Directory Sync
- Multi-Site Support
jueves, 23 de julio de 2015
how GLPI compares to the average help desk software:
http://help-desk.softwareinsider.com/compare/4-13/GLPI-vs-OTRS-Help-Desk

viernes, 19 de junio de 2015
Archivos duplicados ? programas para eliminarlos
:
Duplicate Finder Free
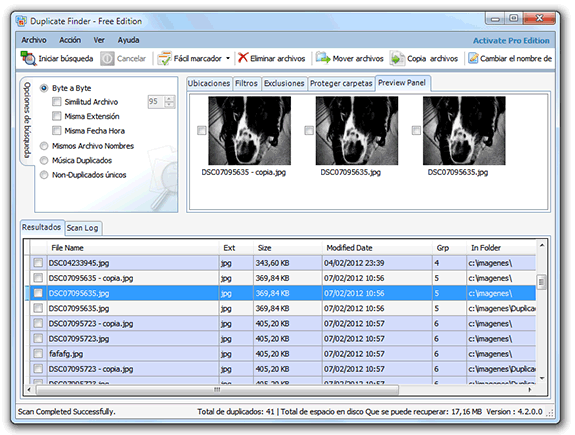
Además Ashisoft también tiene varias aplicaciones especializadas en la búsqueda de imágenes o fotografías duplicadas, archivos de audio duplicados o incluso canciones de iTunes duplicadas.
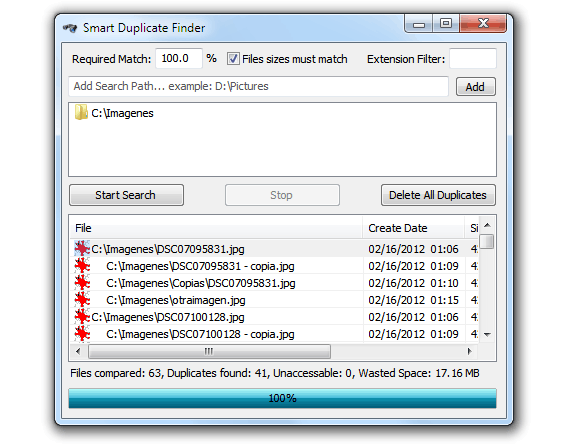
Smart Duplicate Finder
DupKiller
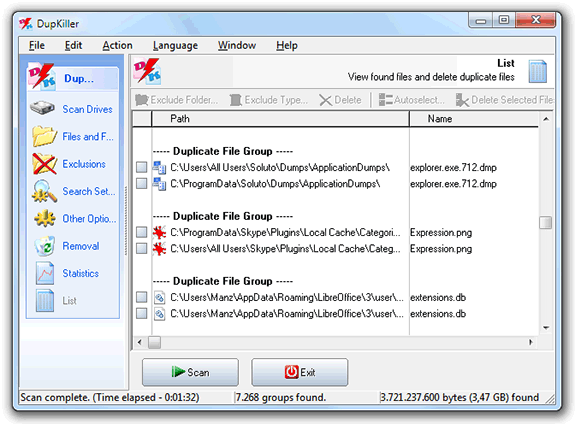
En la página de descarga también puedes descargar el idioma español, para aplicarlo y traducir el programa.
DoubleKiller
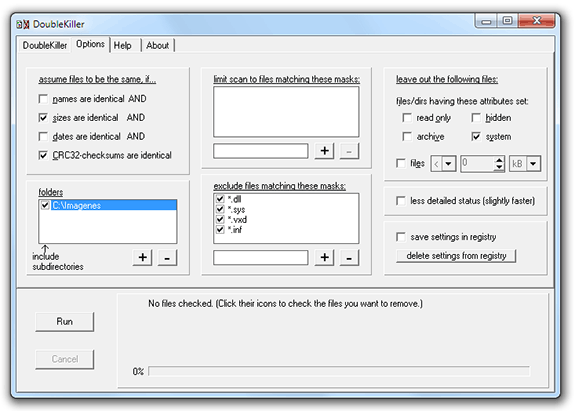
El programa permite realizar búsquedas por nombres, tamaños, fechas y/o suma de verificación CRC32 idéntica (por defecto la combinación de tamaño y CRC32 es muy efectiva). Permite limitar mediante máscaras, excluir ciertos tipos de archivos (o con ciertas características). Si se nos da muy mal el inglés, tenemos a nuestra disposición un manual en español del DoubleKiller
Dup Scout
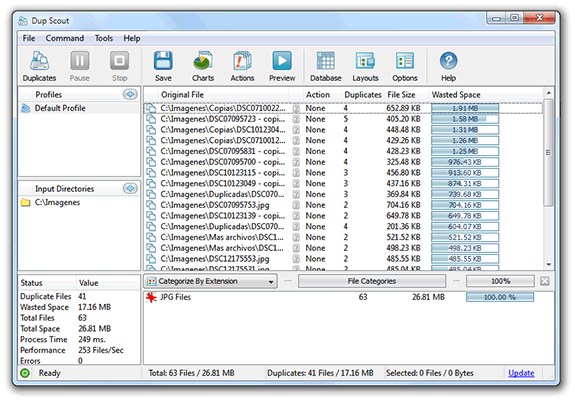
La aplicación permite la creación de pequeñas gráficas con el espacio duplicado que podríamos liberar, comprimir información, borrar duplicados o generar informes.
Auslogics Duplicate File Finder
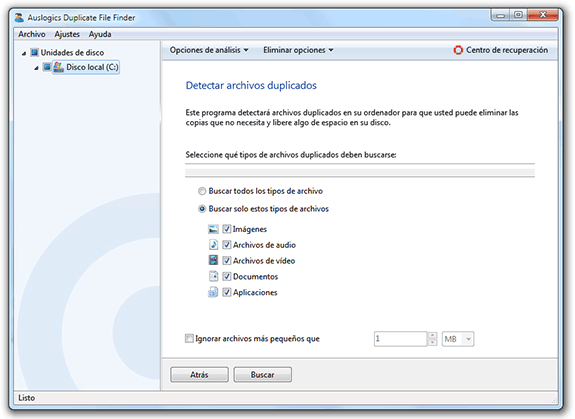
Quizás, para usuarios avanzados puede quedarse un poco corto, pero cumple bastante bien su cometido.
DeadRinger
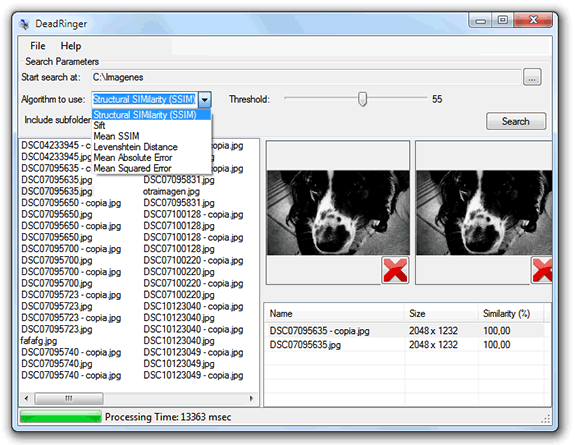
En principio, permite realizar la búsqueda con varios algoritmos diferentes, que utilizarán un umbral de similitudes para encontrar archivos duplicados. Además, permite la previsualización de los archivos de imágenes encontrados, permitiendo comprobar fácilmente si se trata realmente de un archivo duplicado o no.
Fuente:
http://www.emezeta.com/articulos/12-programas-gratuitos-para-eliminar-ficheros-duplicados
sábado, 11 de abril de 2015
Antivirus gratis 2015
Los mejores antivirus gratis para el 2015.
Estos productos tiene versiones gratis y comerciales, la ventaja es poderlos usar para el equipo personal durante 1 año sin problemas.
Productos evaluados
Avira
Avast
AVG
Windows defender
Malwarebytes
Yo instale para Windows 8, el AVG
Fuente: http://www.tomsguide.com/us/best-antivirus,review-2588-5.html
Estos productos tiene versiones gratis y comerciales, la ventaja es poderlos usar para el equipo personal durante 1 año sin problemas.
Productos evaluados
Avira
Avast
AVG
Windows defender
Malwarebytes


Yo instale para Windows 8, el AVG
Fuente: http://www.tomsguide.com/us/best-antivirus,review-2588-5.html
viernes, 3 de abril de 2015
VirtualBox maquina virtual de Oracle Libre
para los ingenieros y desarrolladores de sistemas de informacion las maquinas virtuales se han convertido en una herramienta de aprendizaje y pruebas.

https://www.virtualbox.org
https://www.virtualbox.org
miércoles, 1 de abril de 2015
Manejo de imagenes de discos o formatos de archivos.
Libre para uso no comercial o casa

http://www.disk-tools.com/download/daemon
Do you need just to create or mount image file of popular format? DAEMON Tools Lite is exactly what you need. Free for home and non-commercial use, this software solution will provide you with the basic functions for operating with virtual devices.
http://www.disk-tools.com/download/daemon
Do you need just to create or mount image file of popular format? DAEMON Tools Lite is exactly what you need. Free for home and non-commercial use, this software solution will provide you with the basic functions for operating with virtual devices.
martes, 31 de marzo de 2015
Centro de desarrollo de motorola para android
https://developer.motorolasolutions.com/community/android
Leer codigo de barras en TC55 Motorola
DWDEMO SAMPLE, aplicacion del TC55 de motorola
NAME
DWDemo Sample - How to capture DataWedge output in your Android application
SYNOPSIS
DataWedge on Android has the ability to output captured data via Intents.
This article describes how to receive and use intents from DataWedge in your Android application.
Knowledge of Android programming and familiarity with the Android intent mechanism are assumed. Also assumed is some familarity with DataWedge and that you have read the DataWedge section in the Integrator Guide for your device.
APPLICATION LAYOUT
For this article we created an Android application with a blank activity using Eclipse, to which we added the following layout.
<?xml version="1.0" encoding="utf-8"?>
<LinearLayout xmlns:android="http://schemas.android.com/apk/res/android"
    android:layout_width="fill_parent"
    android:layout_height="fill_parent"
    android:orientation="vertical" >

    <LinearLayout
        android:layout_width="fill_parent"
        android:layout_height="wrap_content"
        android:orientation="horizontal" >

        <ImageView
            android:id="@+id/logo"
            style="@style/logo"
            android:contentDescription="@string/title" />

        <LinearLayout
            android:layout_width="fill_parent"
            android:layout_height="wrap_content"
            android:orientation="vertical" >

            <TextView style="@style/title" />

            <TextView style="@style/copyright" />

            </LinearLayout>
    </LinearLayout>

    <View style="@style/hr" />

    <TextView style="@style/intro" />

    <EditText
        android:id="@+id/editbox"
        style="@style/editbox"
        android:inputType="textMultiLine"
        />

</LinearLayout>
The things to note in the above layout are the ImageView and the EditText widgets. The ImageView widget will effectively act as a button which can be used to toggle the scanner instead of pressing the trigger button on the device. The EditText widget will be used to display the data that we receive in the intent.
INTENT STRINGS
The intent we will received from DataWedge will contain a bundle of data which we will be retrieving using the Intent.getStringtExtra() and Intent.getSerializableExtra() methods. The following is a list of the data item names that the bundle could contain.
- String SOURCE_TAG = "com.motorolasolutions.emdk.datawedge.source";
- String contains the source of the data i.e. scanner or MSR
- String DATA_STRING_TAG = "com.motorolasolutions.emdk.datawedge.data_string";
- String contains the output data as a String. In the case of concatenated bar codes, the decode data is concatenated and sent out as a single string. In the case of MSR output, the data from the MSR tracks is concatenated and sent out as a single string.
- String LABEL_TYPE_TAG = "com.motorolasolutions.emdk.datawedge.label_type";
- String contains the label type of the bar code.
- String DECODE_DATA_TAG = "com.motorolasolutions.emdk.datawedge.decode_data";
- Decode data returned as a list of byte arrays. In most cases there will be one byte array per decode. For barcode symbologies that support concatenation e.g. Codabar, Code128, MicroPDF, etc., the decoded data is stored in multiple byte arrays (one byte array per bar code). Clients can get data in each byte array by passing an index.
Let’s list the MSR intent names (in case we want to use these in the future).
The MSR related data added to the intent’s bundle can be retrieved using the Intent.getStringtExtra() and Intent.getSerializableExtra() calls, using the following String tags…
- String MSR_DATA_TAG = "com.motorolasolutions.emdk.datawedge.msr_data";
- The data from the MSR tracks is concatenated and sent out as a byte array.
- String MSR_TRACK1_TAG = "com.motorolasolutions.emdk.datawedge.msr_track1";
- MSR track 1 data is returned as a byte array.
- String MSR_TRACK2_TAG = "com.motorolasolutions.emdk.datawedge.msr_track2";
- MSR track 2 data is returned as a byte array.
- String MSR_TRACK3_TAG = "com.motorolasolutions.emdk.datawedge.msr_track3";
- MSR track 3 data is returned as a byte array.
- String MSR_TRACK1_STATUS_TAG = "com.motorolasolutions.emdk.datawedge.msr_track1_status";
- MSR track 1 decode status as an Integer where 0 indicates a successful decode.
- String MSR_TRACK2_STATUS_TAG = "com.motorolasolutions.emdk.datawedge.msr_track2_status";
- MSR track 2 decode status as an Integer where 0 indicates a successful decode.
- String MSR_TRACK3_STATUS_TAG = "com.motorolasolutions.emdk.datawedge.msr_track3_status";
- MSR track 3 decode status as an Integer where 0 indicates a successful decode.
- String MSR_TRACK1_ENCRYPTED_TAG = "com.motorolasolutions.emdk.datawedge.msr_track1_encrypted";
- MSR track 1 encrypted data is returned as a byte array.
- String MSR_TRACK2_ENCRYPTED_TAG = "com.motorolasolutions.emdk.datawedge.msr_track2_encrypted";
- MSR track 2 encrypted data is returned as a byte array.
- String MSR_TRACK3_ENCRYPTED_TAG = "com.motorolasolutions.emdk.datawedge.msr_track3_encrypted";
- MSR track 3 encrypted data is returned as a byte array.
- String MSR_TRACK1_HASHED_TAG = "com.motorolasolutions.emdk.datawedge.msr_track1_hashed";
- MSR track 1 hashed data is returned as a byte array.
- String MSR_TRACK2_HASHED_TAG = "com.motorolasolutions.emdk.datawedge.msr_track2_hashed";
- MSR track 2 hashed data is returned as a byte array.
- String MSR_TRACK3_HASHED_TAG = "com.motorolasolutions.emdk.datawedge.msr_track3_hashed";
- MSR track 3 hashed data is returned as a byte array.
Here are the API intent names for the soft scan trigger…
- String ACTION_SOFTSCANTRIGGER = "com.motorolasolutions.emdk.datawedge.api.ACTION_SOFTSCANTRIGGER";
- This is the intent action for the soft scan trigger.
- String EXTRA_PARAM = "com.motorolasolutions.emdk.datawedge.api.EXTRA_PARAMETER";
- Parameter passed in the intent to specify the action the soft scan trigger should perform. The following actions are recognized…
- String DWAPI_START_SCANNING = "START_SCANNING";
- Start scanning.
- String DWAPI_STOP_SCANNING = "STOP_SCANNING";
- Stop scanning.
- String DWAPI_TOGGLE_SCANNING = "TOGGLE_SCANNING";
- Toggle scanning.
In the code that follows we will just be using the SOURCE_TAG, DATA_STRING_TAG and LABEL_TYPE_TAG intent data to display the intent data in the EditTextwidget.
HANDLING INTENTS
Incoming intents can be handled by overriding the onNewIntent method.
@Override
public void onNewIntent(Intent i) {
    handleDecodeData(i);
}
Our handleDecodeData() method will responsible for getting the data from the intent, formatting it and adding it to the end of the edit box; something like this…
private void handleDecodeData(Intent i) {
    // check the intent action is for us
    if ( i.getAction().contentEquals(com.motorolasolutions.emdk.sample.dwdemosample.RECVR) ) {
        // define a string that will hold our output
        String out = "";
        // get the source of the data
        String source = i.getStringExtra(SOURCE_TAG);
        // save it to use later
        if (source == null) source = "scanner";
        // get the data from the intent
        String data = i.getStringExtra(DATA_STRING_TAG);
        // let's define a variable for the data length
        Integer data_len = 0;
        // and set it to the length of the data
        if (data != null) data_len = data.length();

        // check if the data has come from the barcode scanner
        if (source.equalsIgnoreCase("scanner")) {
            // check if there is anything in the data
            if (data != null && data.length() > 0) {
                // we have some data, so let's get it's symbology
                String sLabelType = i.getStringExtra(LABEL_TYPE_TAG);
                // check if the string is empty
                if (sLabelType != null && sLabelType.length() > 0) {
                    // format of the label type string is LABEL-TYPE-SYMBOLOGY
                    // so let's skip the LABEL-TYPE- portion to get just the symbology
                    sLabelType = sLabelType.substring(11);
                }
                else {
                    // the string was empty so let's set it to "Unknown"
                    sLabelType = "Unknown";
                }
                // let's construct the beginning of our output string
                out = "Source: Scanner, " + "Symbology: " + sLabelType + ", Length: " + data_len.toString() + ", Data: ...\r\n";
            }
        }

        // check if the data has come from the MSR
        if (source.equalsIgnoreCase("msr")) {
            // construct the beginning of our output string
            out = "Source: MSR, Length: " + data_len.toString() + ", Data: ...\r\n";
        }

        // let's get our edit box view
        EditText et = (EditText)findViewById(R.id.editbox);
        // and get it's text into an editable string
        Editable txt = et.getText();
        // now because we want format our output
        // we need to put the edit box text into a spannable string builder
        SpannableStringBuilder stringbuilder = new SpannableStringBuilder(txt);
        // add the output string we constructed earlier
        stringbuilder.append(out);
        // now let's highlight our output string in bold type
        stringbuilder.setSpan(new StyleSpan(Typeface.BOLD), txt.length(), stringbuilder.length(), SpannableString.SPAN_EXCLUSIVE_EXCLUSIVE);
        // then add the barcode or msr data, plus a new line, and add it to the string builder
        stringbuilder.append(data + "\r\n");
        // now let's update the text in the edit box
        et.setText(stringbuilder);
        // we want the text cursor to be at the end of the edit box
        // so let's get the edit box text again
        txt = et.getText();
        // and set the cursor position at the end of the text
        et.setSelection(txt.length());
        // and we are done!
    }

}
TOGGLING THE SCAN TRIGGER
Our activity layout has an ImageView which we will use as a button to toggle the scan trigger. This is done by sending an intent to DataWedge. The following code toggles the scan trigger each time the image is tapped.
ImageView img = (ImageView) findViewById(R.id.dwdemo_logo);
img.setOnClickListener(new OnClickListener() {
    @Override
    public void onClick(View v) {
        Intent i = new Intent();
        i.setAction(ACTION_SOFTSCANTRIGGER);
        i.putExtra(EXTRA_PARAM, DWAPI_TOGGLE_SCANNING);
        DWDemoActivity.this.sendBroadcast(i);
        Toast.makeText(v.getContext(), "Soft scan trigger toggled.", Toast.LENGTH_SHORT).show();
    }
});
PUTTING ALL THE CODE TOGETHER
Let’s put all that code together so that we can see what our final activity class should look like.
package com.motorolasolutions.emdk.sample.dwdemosample;

import android.os.Bundle;
import android.app.Activity;
import android.content.Intent;
import android.graphics.Typeface;
import android.view.View;
import android.view.View.OnClickListener;
import android.widget.EditText;
import android.widget.ImageView;
import android.widget.Toast;
import android.text.Editable;
import android.text.SpannableString;
import android.text.SpannableStringBuilder;
import android.text.style.StyleSpan;

public class MainActivity extends Activity {
    // Tag used for logging errors
    private static final String TAG = MainActivity.class.getSimpleName();

    // Let's define some intent strings
    // This intent string contains the source of the data as a string
    private static final String SOURCE_TAG = "com.motorolasolutions.emdk.datawedge.source";
    // This intent string contains the barcode symbology as a string
    private static final String LABEL_TYPE_TAG = "com.motorolasolutions.emdk.datawedge.label_type";
    // This intent string contains the barcode data as a byte array list
    private static final String DECODE_DATA_TAG = "com.motorolasolutions.emdk.datawedge.decode_data";

    // This intent string contains the captured data as a string
    // (in the case of MSR this data string contains a concatenation of the track data)
    private static final String DATA_STRING_TAG = "com.motorolasolutions.emdk.datawedge.data_string";

    // Let's define the MSR intent strings (in case we want to use these in the future)
    private static final String MSR_DATA_TAG = "com.motorolasolutions.emdk.datawedge.msr_data";
    private static final String MSR_TRACK1_TAG = "com.motorolasolutions.emdk.datawedge.msr_track1";
    private static final String MSR_TRACK2_TAG = "com.motorolasolutions.emdk.datawedge.msr_track2";
    private static final String MSR_TRACK3_TAG = "com.motorolasolutions.emdk.datawedge.msr_track3";
    private static final String MSR_TRACK1_STATUS_TAG = "com.motorolasolutions.emdk.datawedge.msr_track1_status";
    private static final String MSR_TRACK2_STATUS_TAG = "com.motorolasolutions.emdk.datawedge.msr_track2_status";
    private static final String MSR_TRACK3_STATUS_TAG = "com.motorolasolutions.emdk.datawedge.msr_track3_status";
    private static final String MSR_TRACK1_ENCRYPTED_TAG = "com.motorolasolutions.emdk.datawedge.msr_track1_encrypted";
    private static final String MSR_TRACK2_ENCRYPTED_TAG = "com.motorolasolutions.emdk.datawedge.msr_track2_encrypted";
    private static final String MSR_TRACK3_ENCRYPTED_TAG = "com.motorolasolutions.emdk.datawedge.msr_track3_encrypted";
    private static final String MSR_TRACK1_HASHED_TAG = "com.motorolasolutions.emdk.datawedge.msr_track1_hashed";
    private static final String MSR_TRACK2_HASHED_TAG = "com.motorolasolutions.emdk.datawedge.msr_track2_hashed";
    private static final String MSR_TRACK3_HASHED_TAG = "com.motorolasolutions.emdk.datawedge.msr_track3_hashed";

    // Let's define the API intent strings for the soft scan trigger
    private static final String ACTION_SOFTSCANTRIGGER = "com.motorolasolutions.emdk.datawedge.api.ACTION_SOFTSCANTRIGGER";
    private static final String EXTRA_PARAM = "com.motorolasolutions.emdk.datawedge.api.EXTRA_PARAMETER";
    private static final String DWAPI_START_SCANNING = "START_SCANNING";
    private static final String DWAPI_STOP_SCANNING = "STOP_SCANNING";
    private static final String DWAPI_TOGGLE_SCANNING = "TOGGLE_SCANNING";

    private static String ourIntentAction = "com.motorolasolutions.emdk.sample.dwdemosample.RECVR";


    @Override
    public void onCreate(Bundle savedInstanceState) {
        super.onCreate(savedInstanceState);
        setContentView(R.layout.activity_main);

        // Let's set the cursor at the end of any text in the editable text field
        EditText et = (EditText)findViewById(R.id.editbox);
        Editable txt = et.getText();
        et.setSelection(txt.length());

        // Since we will be using the image as a soft scan trigger toggle button
        // let's handle the image on onClick event
        ImageView img = (ImageView) findViewById(R.id.logo);
        img.setOnClickListener(new OnClickListener() {
            @Override
            public void onClick(View v) {
                // the image has been tapped so shoot off the intent to DataWedge
                // to toggle the soft scan trigger
                // Create a new intent
                Intent i = new Intent();
                // set the intent action using soft scan trigger action string declared earlier
                i.setAction(ACTION_SOFTSCANTRIGGER);
                // add a string parameter to tell DW that we want to toggle the soft scan trigger
                i.putExtra(EXTRA_PARAM, DWAPI_TOGGLE_SCANNING);
                // now broadcast the intent
                MainActivity.this.sendBroadcast(i);
                // provide some feedback to the user that we did something
                Toast.makeText(v.getContext(), "Soft scan trigger toggled.", Toast.LENGTH_SHORT).show();
            }
        });

        // in case we have been launched by the DataWedge intent plug-in
        // using the StartActivity method let's handle the intent
        Intent i = getIntent();
        handleDecodeData(i);
    }


    // We need to handle any incoming intents, so let override the onNewIntent method
    @Override
    public void onNewIntent(Intent i) {
        handleDecodeData(i);
    }

    // This method is responsible for getting the data from the intent
    // formatting it and adding it to the end of the edit box
    private void handleDecodeData(Intent i) {
        // check the intent action is for us
        if ( i.getAction().contentEquals(ourIntentAction) ) {
            // define a string that will hold our output
            String out = "";
            // get the source of the data
            String source = i.getStringExtra(SOURCE_TAG);
            // save it to use later
            if (source == null) source = "scanner";
            // get the data from the intent
            String data = i.getStringExtra(DATA_STRING_TAG);
            // let's define a variable for the data length
            Integer data_len = 0;
            // and set it to the length of the data
            if (data != null) data_len = data.length();

            // check if the data has come from the barcode scanner
            if (source.equalsIgnoreCase("scanner")) {
                // check if there is anything in the data
                if (data != null && data.length() > 0) {
                    // we have some data, so let's get it's symbology
                    String sLabelType = i.getStringExtra(LABEL_TYPE_TAG);
                    // check if the string is empty
                    if (sLabelType != null && sLabelType.length() > 0) {
                        // format of the label type string is LABEL-TYPE-SYMBOLOGY
                        // so let's skip the LABEL-TYPE- portion to get just the symbology
                        sLabelType = sLabelType.substring(11);
                    }
                    else {
                        // the string was empty so let's set it to "Unknown"
                        sLabelType = "Unknown";
                    }
                    // let's construct the beginning of our output string
                    out = "Source: Scanner, " + "Symbology: " + sLabelType + ", Length: " + data_len.toString() + ", Data: ...\r\n";
                }
            }

            // check if the data has come from the MSR
            if (source.equalsIgnoreCase("msr")) {
                // construct the beginning of our output string
                out = "Source: MSR, Length: " + data_len.toString() + ", Data: ...\r\n";
            }

            // let's get our edit box view
            EditText et = (EditText)findViewById(R.id.editbox);
            // and get it's text into an editable string
            Editable txt = et.getText();
            // now because we want format our output
            // we need to put the edit box text into a spannable string builder
            SpannableStringBuilder stringbuilder = new SpannableStringBuilder(txt);
            // add the output string we constructed earlier
            stringbuilder.append(out);
            // now let's highlight our output string in bold type
            stringbuilder.setSpan(new StyleSpan(Typeface.BOLD), txt.length(), stringbuilder.length(), SpannableString.SPAN_EXCLUSIVE_EXCLUSIVE);
            // then add the barcode or msr data, plus a new line, and add it to the string builder
            stringbuilder.append(data + "\r\n");
            // now let's update the text in the edit box
            et.setText(stringbuilder);
            // we want the text cursor to be at the end of the edit box
            // so let's get the edit box text again
            txt = et.getText();
            // and set the cursor position at the end of the text
            et.setSelection(txt.length());
            // and we are done!
        }

    }

}
DEFINING INTENT FILTERS
Having dealt with the coding of our activity, we now need to inform the system which implicit intents our application can handle. For that we need to define an intent-filteras follows.
<intent-filter>
    <action android:name="com.motorolasolutions.emdk.sample.dwdemosample.RECVR"/>
    <category android:name="android.intent.category.DEFAULT"/>
</intent-filter>
We will be using the com.motorolasolutions.emdk.sample.dwdemosample.RECVR action and the android.intent.category.DEFAULT category we have just defined above later on when we come to configure our DataWedge profile.
In this acticle DataWedge is configured to use the startActivity() method to send the intent. The startActivity() method causes a new activity to be launched. However since we do not want another instance of our activity launched each time we receive an intent, we need to specify the launch mode of our activity as single task.
android:launchMode="singleTask"
After adding the above, our AndroidManifest.xml should look something like this…
<manifest xmlns:android="http://schemas.android.com/apk/res/android"
    package="com.motorolasolutions.emdk.sample.dwdemosample"
    android:versionCode="1"
    android:versionName="1.0.0" >

    <uses-sdk
        android:minSdkVersion="10"
        android:targetSdkVersion="10" />

    <application
        android:icon="@drawable/ic_launcher"
        android:label="@string/app_name"
        android:theme="@style/AppTheme" >
        <activity
            android:name=".MainActivity"
            android:label="@string/app_name"
            android:launchMode="singleTask" >
            <intent-filter>
                <action android:name="android.intent.action.MAIN" />
                <category android:name="android.intent.category.LAUNCHER" />
            </intent-filter>
            <intent-filter>
                <action android:name="com.motorolasolutions.emdk.sample.dwdemosample.RECVR"/>
                <category android:name="android.intent.category.DEFAULT"/>
            </intent-filter>
            </activity>
    </application>

</manifest>
CONFIGURING DATAWEDGE
Now we need to configure DataWedge to send the desired intent to our application.
The following steps will help you get started…
- Launch DataWedge
- Create a new profile and give it a name such as "dwdemosample"
- Edit the profile
- Go into Associated apps, tap the menu button, and add a new app/activity
- For the application select com.motorolasolutions.emdk.sample.dwdemosample
- For the activity select com.motorolasolutions.emdk.sample.dwdemosample.MainActivty
- Go back and disable the keystroke output plug-in
- Enable the intent output plug-in
- For the intent action enter com.motorolasolutions.emdk.sample.dwdemosample.RECVR
- For the intent category enter android.intent.category.DEFAULT
SUMMARY
That’s it. You should now be able to scan a barcode and see it appear in the sample application.
In this arcticle, we covered…
- DataWedge intent strings
- Handling intents from DataWedge
- Receiving barcode/MSR data
- Sending intents to DataWedge
- Toggling of the soft scan trigger
- Defining intent filters
- Configuring DataWedge to send intents to our application
Fuente: https://launchpad.motorolasolutions.com/documents/dwdemo_sample.html
Suscribirse a:
Entradas (Atom)