DWDemo Sample - How to capture DataWedge output in your Android application
SYNOPSIS
DataWedge on Android has the ability to output captured data via Intents.
This article describes how to receive and use intents from DataWedge in your Android application.
Knowledge of Android programming and familiarity with the Android intent mechanism are assumed. Also assumed is some familarity with DataWedge and that you have read the DataWedge section in the Integrator Guide for your device.
APPLICATION LAYOUT
For this article we created an Android application with a blank activity using Eclipse, to which we added the following layout.
The things to note in the above layout are the ImageView and the EditText widgets. The ImageView widget will effectively act as a button which can be used to toggle the scanner instead of pressing the trigger button on the device. The EditText widget will be used to display the data that we receive in the intent.
INTENT STRINGS
The intent we will received from DataWedge will contain a bundle of data which we will be retrieving using the Intent.getStringtExtra() and Intent.getSerializableExtra() methods. The following is a list of the data item names that the bundle could contain.
String contains the output data as a String. In the case of concatenated bar codes, the decode data is concatenated and sent out as a single string. In the case of MSR output, the data from the MSR tracks is concatenated and sent out as a single string.
Decode data returned as a list of byte arrays. In most cases there will be one byte array per decode. For barcode symbologies that support concatenation e.g. Codabar, Code128, MicroPDF, etc., the decoded data is stored in multiple byte arrays (one byte array per bar code). Clients can get data in each byte array by passing an index.
Let’s list the MSR intent names (in case we want to use these in the future).
The MSR related data added to the intent’s bundle can be retrieved using the Intent.getStringtExtra() and Intent.getSerializableExtra() calls, using the following String tags…
Parameter passed in the intent to specify the action the soft scan trigger should perform. The following actions are recognized…
String DWAPI_START_SCANNING = "START_SCANNING";
Start scanning.
String DWAPI_STOP_SCANNING = "STOP_SCANNING";
Stop scanning.
String DWAPI_TOGGLE_SCANNING = "TOGGLE_SCANNING";
Toggle scanning.
In the code that follows we will just be using the SOURCE_TAG, DATA_STRING_TAG and LABEL_TYPE_TAG intent data to display the intent data in the EditTextwidget.
HANDLING INTENTS
Incoming intents can be handled by overriding the onNewIntent method.
Our handleDecodeData() method will responsible for getting the data from the intent, formatting it and adding it to the end of the edit box; something like this…
privatevoidhandleDecodeData(Intent i){// check the intent action is for usif( i.getAction().contentEquals(com.motorolasolutions.emdk.sample.dwdemosample.RECVR)){// define a string that will hold our outputString out ="";// get the source of the dataString source = i.getStringExtra(SOURCE_TAG);// save it to use laterif(source ==null) source ="scanner";// get the data from the intentString data = i.getStringExtra(DATA_STRING_TAG);// let's define a variable for the data lengthInteger data_len =0;// and set it to the length of the dataif(data !=null) data_len = data.length();// check if the data has come from the barcode scannerif(source.equalsIgnoreCase("scanner")){// check if there is anything in the dataif(data !=null&& data.length()>0){// we have some data, so let's get it's symbologyString sLabelType = i.getStringExtra(LABEL_TYPE_TAG);// check if the string is emptyif(sLabelType !=null&& sLabelType.length()>0){// format of the label type string is LABEL-TYPE-SYMBOLOGY// so let's skip the LABEL-TYPE- portion to get just the symbology
sLabelType = sLabelType.substring(11);}else{// the string was empty so let's set it to "Unknown"
sLabelType ="Unknown";}// let's construct the beginning of our output string
out ="Source: Scanner, "+"Symbology: "+ sLabelType +", Length: "+ data_len.toString()+", Data: ...\r\n";}}// check if the data has come from the MSRif(source.equalsIgnoreCase("msr")){// construct the beginning of our output string
out ="Source: MSR, Length: "+ data_len.toString()+", Data: ...\r\n";}// let's get our edit box viewEditText et =(EditText)findViewById(R.id.editbox);// and get it's text into an editable stringEditable txt = et.getText();// now because we want format our output// we need to put the edit box text into a spannable string builderSpannableStringBuilder stringbuilder =newSpannableStringBuilder(txt);// add the output string we constructed earlier
stringbuilder.append(out);// now let's highlight our output string in bold type
stringbuilder.setSpan(newStyleSpan(Typeface.BOLD), txt.length(), stringbuilder.length(), SpannableString.SPAN_EXCLUSIVE_EXCLUSIVE);// then add the barcode or msr data, plus a new line, and add it to the string builder
stringbuilder.append(data +"\r\n");// now let's update the text in the edit box
et.setText(stringbuilder);// we want the text cursor to be at the end of the edit box// so let's get the edit box text again
txt = et.getText();// and set the cursor position at the end of the text
et.setSelection(txt.length());// and we are done!}}
TOGGLING THE SCAN TRIGGER
Our activity layout has an ImageView which we will use as a button to toggle the scan trigger. This is done by sending an intent to DataWedge. The following code toggles the scan trigger each time the image is tapped.
Let’s put all that code together so that we can see what our final activity class should look like.
package com.motorolasolutions.emdk.sample.dwdemosample;import android.os.Bundle;import android.app.Activity;import android.content.Intent;import android.graphics.Typeface;import android.view.View;import android.view.View.OnClickListener;import android.widget.EditText;import android.widget.ImageView;import android.widget.Toast;import android.text.Editable;import android.text.SpannableString;import android.text.SpannableStringBuilder;import android.text.style.StyleSpan;publicclassMainActivityextends Activity {// Tag used for logging errorsprivatestaticfinalString TAG = MainActivity.class.getSimpleName();// Let's define some intent strings// This intent string contains the source of the data as a stringprivatestaticfinalString SOURCE_TAG ="com.motorolasolutions.emdk.datawedge.source";// This intent string contains the barcode symbology as a stringprivatestaticfinalString LABEL_TYPE_TAG ="com.motorolasolutions.emdk.datawedge.label_type";// This intent string contains the barcode data as a byte array listprivatestaticfinalString DECODE_DATA_TAG ="com.motorolasolutions.emdk.datawedge.decode_data";// This intent string contains the captured data as a string// (in the case of MSR this data string contains a concatenation of the track data)privatestaticfinalString DATA_STRING_TAG ="com.motorolasolutions.emdk.datawedge.data_string";// Let's define the MSR intent strings (in case we want to use these in the future)privatestaticfinalString MSR_DATA_TAG ="com.motorolasolutions.emdk.datawedge.msr_data";privatestaticfinalString MSR_TRACK1_TAG ="com.motorolasolutions.emdk.datawedge.msr_track1";privatestaticfinalString MSR_TRACK2_TAG ="com.motorolasolutions.emdk.datawedge.msr_track2";privatestaticfinalString MSR_TRACK3_TAG ="com.motorolasolutions.emdk.datawedge.msr_track3";privatestaticfinalString MSR_TRACK1_STATUS_TAG ="com.motorolasolutions.emdk.datawedge.msr_track1_status";privatestaticfinalString MSR_TRACK2_STATUS_TAG ="com.motorolasolutions.emdk.datawedge.msr_track2_status";privatestaticfinalString MSR_TRACK3_STATUS_TAG ="com.motorolasolutions.emdk.datawedge.msr_track3_status";privatestaticfinalString MSR_TRACK1_ENCRYPTED_TAG ="com.motorolasolutions.emdk.datawedge.msr_track1_encrypted";privatestaticfinalString MSR_TRACK2_ENCRYPTED_TAG ="com.motorolasolutions.emdk.datawedge.msr_track2_encrypted";privatestaticfinalString MSR_TRACK3_ENCRYPTED_TAG ="com.motorolasolutions.emdk.datawedge.msr_track3_encrypted";privatestaticfinalString MSR_TRACK1_HASHED_TAG ="com.motorolasolutions.emdk.datawedge.msr_track1_hashed";privatestaticfinalString MSR_TRACK2_HASHED_TAG ="com.motorolasolutions.emdk.datawedge.msr_track2_hashed";privatestaticfinalString MSR_TRACK3_HASHED_TAG ="com.motorolasolutions.emdk.datawedge.msr_track3_hashed";// Let's define the API intent strings for the soft scan triggerprivatestaticfinalString ACTION_SOFTSCANTRIGGER ="com.motorolasolutions.emdk.datawedge.api.ACTION_SOFTSCANTRIGGER";privatestaticfinalString EXTRA_PARAM ="com.motorolasolutions.emdk.datawedge.api.EXTRA_PARAMETER";privatestaticfinalString DWAPI_START_SCANNING ="START_SCANNING";privatestaticfinalString DWAPI_STOP_SCANNING ="STOP_SCANNING";privatestaticfinalString DWAPI_TOGGLE_SCANNING ="TOGGLE_SCANNING";privatestaticString ourIntentAction ="com.motorolasolutions.emdk.sample.dwdemosample.RECVR";
@Override
publicvoidonCreate(Bundle savedInstanceState){super.onCreate(savedInstanceState);setContentView(R.layout.activity_main);// Let's set the cursor at the end of any text in the editable text fieldEditText et =(EditText)findViewById(R.id.editbox);Editable txt = et.getText();
et.setSelection(txt.length());// Since we will be using the image as a soft scan trigger toggle button// let's handle the image on onClick eventImageView img =(ImageView)findViewById(R.id.logo);
img.setOnClickListener(newOnClickListener(){
@Override
publicvoidonClick(View v){// the image has been tapped so shoot off the intent to DataWedge// to toggle the soft scan trigger// Create a new intentIntent i =newIntent();// set the intent action using soft scan trigger action string declared earlier
i.setAction(ACTION_SOFTSCANTRIGGER);// add a string parameter to tell DW that we want to toggle the soft scan trigger
i.putExtra(EXTRA_PARAM, DWAPI_TOGGLE_SCANNING);// now broadcast the intent
MainActivity.this.sendBroadcast(i);// provide some feedback to the user that we did something
Toast.makeText(v.getContext(),"Soft scan trigger toggled.", Toast.LENGTH_SHORT).show();}});// in case we have been launched by the DataWedge intent plug-in// using the StartActivity method let's handle the intentIntent i =getIntent();handleDecodeData(i);}// We need to handle any incoming intents, so let override the onNewIntent method
@Override
publicvoidonNewIntent(Intent i){handleDecodeData(i);}// This method is responsible for getting the data from the intent// formatting it and adding it to the end of the edit boxprivatevoidhandleDecodeData(Intent i){// check the intent action is for usif( i.getAction().contentEquals(ourIntentAction)){// define a string that will hold our outputString out ="";// get the source of the dataString source = i.getStringExtra(SOURCE_TAG);// save it to use laterif(source ==null) source ="scanner";// get the data from the intentString data = i.getStringExtra(DATA_STRING_TAG);// let's define a variable for the data lengthInteger data_len =0;// and set it to the length of the dataif(data !=null) data_len = data.length();// check if the data has come from the barcode scannerif(source.equalsIgnoreCase("scanner")){// check if there is anything in the dataif(data !=null&& data.length()>0){// we have some data, so let's get it's symbologyString sLabelType = i.getStringExtra(LABEL_TYPE_TAG);// check if the string is emptyif(sLabelType !=null&& sLabelType.length()>0){// format of the label type string is LABEL-TYPE-SYMBOLOGY// so let's skip the LABEL-TYPE- portion to get just the symbology
sLabelType = sLabelType.substring(11);}else{// the string was empty so let's set it to "Unknown"
sLabelType ="Unknown";}// let's construct the beginning of our output string
out ="Source: Scanner, "+"Symbology: "+ sLabelType +", Length: "+ data_len.toString()+", Data: ...\r\n";}}// check if the data has come from the MSRif(source.equalsIgnoreCase("msr")){// construct the beginning of our output string
out ="Source: MSR, Length: "+ data_len.toString()+", Data: ...\r\n";}// let's get our edit box viewEditText et =(EditText)findViewById(R.id.editbox);// and get it's text into an editable stringEditable txt = et.getText();// now because we want format our output// we need to put the edit box text into a spannable string builderSpannableStringBuilder stringbuilder =newSpannableStringBuilder(txt);// add the output string we constructed earlier
stringbuilder.append(out);// now let's highlight our output string in bold type
stringbuilder.setSpan(newStyleSpan(Typeface.BOLD), txt.length(), stringbuilder.length(), SpannableString.SPAN_EXCLUSIVE_EXCLUSIVE);// then add the barcode or msr data, plus a new line, and add it to the string builder
stringbuilder.append(data +"\r\n");// now let's update the text in the edit box
et.setText(stringbuilder);// we want the text cursor to be at the end of the edit box// so let's get the edit box text again
txt = et.getText();// and set the cursor position at the end of the text
et.setSelection(txt.length());// and we are done!}}}
DEFINING INTENT FILTERS
Having dealt with the coding of our activity, we now need to inform the system which implicit intents our application can handle. For that we need to define an intent-filteras follows.
We will be using the com.motorolasolutions.emdk.sample.dwdemosample.RECVR action and the android.intent.category.DEFAULT category we have just defined above later on when we come to configure our DataWedge profile.
In this acticle DataWedge is configured to use the startActivity() method to send the intent. The startActivity() method causes a new activity to be launched. However since we do not want another instance of our activity launched each time we receive an intent, we need to specify the launch mode of our activity as single task.
android:launchMode="singleTask"
After adding the above, our AndroidManifest.xml should look something like this…
En este tutorial usamos el ZXing libreria de Zebra para desarrollar una aplicacion de lector de codigo de barras para andriod.
1. Create a New Android Project
Step 1
In Eclipse, create a new Android project. Enter your chosen application, project, and package names. Let Eclipse create a blank activity for you, with the name of your choice for both the activity and its layout.
Step 2
Open your main layout file. With the default settings, Eclipse starts your layout with aRelative Layout object, which you can leave as is. Inside of it, replace the existing content (typically a Text View) with a button.
After the button, add two Text Views in which we will output scanning information.
01
02
03
04
05
06
07
08
09
10
11
12
13
14
<TextView
android:id="@+id/scan_format"
android:layout_width="wrap_content"
android:layout_height="wrap_content"
android:textIsSelectable="true"
android:layout_centerHorizontal="true"
android:layout_below="@id/scan_button"/>
<TextView
android:id="@+id/scan_content"
android:layout_width="wrap_content"
android:layout_height="wrap_content"
android:textIsSelectable="true"
android:layout_centerHorizontal="true"
android:layout_below="@id/scan_format"/>
Add the button text string to your "res/values/strings" XML file.
1
<stringname="scan">Scan</string>
The user will press the button to scan. When the app receives a result from the barcode scanning operation, it will display the scan content data and format name in the two Text Views.
2. Add ZXing to Your Project
Step 1
ZXing is an open source library that provides access to tested and functional barcode scanning on Android. Many users will already have the app installed on their devices, so you can simply launch the scanning Intents and retrieve the results. In this tutorial we are going to use the Scanning via Intent method to make scanning easier. This method involves importing a couple of classes into your app and lets ZXing take care of instances where the user does not have the scanner installed. If the user doesn't have the barcode scanner installed, they'll be prompted to download it.
Tip: Since ZXing is open source, you can import the source code into your projects in its entirety. However, this is really only advisable if you need to make changes to its functionality. You can also compile the project and include its JAR file in your own apps if you prefer. For most purposes, using Scanning via Intent is a reliable and easy to implement options, plus your users will have access to the most recent version of the ZXing app.
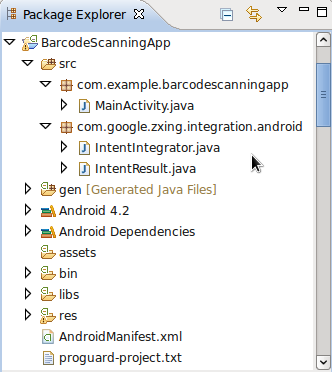
In Eclipse, add a new package to your project by right-clicking the "src" folder and choosing "New", then "Package", and entering "com.google.zxing.integration.android" as the package name.
Step 2
Eclipse offers several ways to import existing code into your projects. For the purposes of this tutorial, you'll probably find it easiest to simply create the two required classes and copy the code from ZXing. Right-click your new package, choose "New" then "Class" and enter "IntentIntegrator" as the class name. You can leave the other default settings the way they are. Once you've created this class, do the same for the other class we'll be importing, giving it "IntentResult" as its class name.
Copy the code from both classes in the ZXing library and paste it into the class files you created. These are IntentIntegrator and IntentResult. Refer to the source code download if you're in any doubt about where the various files and folders should be or what should be in them.
You can now import the ZXing classes into your main Activity class.
Go ahead and add the other import statements we'll use for this tutorial. Bear in mind that Eclipse may have already added some for you.
1
2
3
4
5
6
7
8
importandroid.os.Bundle;
importandroid.app.Activity;
importandroid.content.Intent;
importandroid.view.View;
importandroid.view.View.OnClickListener;
importandroid.widget.Button;
importandroid.widget.TextView;
importandroid.widget.Toast;
Feel free to have a look at the content of the two ZXing classes. It's fairly straightforward, but the details of the barcode scanning processing are carried out elsewhere in the library. These two classes really act as an interface to the scanning functionality.
3. Do Some Scanning
Step 1
Let's implement scanning when the user clicks the button we added. In your app's main activity class, the default onCreate method entered by Eclipse should look something like this.
Now we can call on the Intent Integrator method to start scanning.
1
scanIntegrator.initiateScan();
At this point, the scanner will start if it's installed on the user's device. If not, they'll be prompted to download it. The results of the scan will be returned to the main activitywhere scanning was initiated, so we'll be able to retrieve it in the onActivityResultmethod.
Tip: When you call the initiateScan method, you can choose to pass a collection of the barcode types you want to scan. By default, the method will scan for all supported types. These include UPC-A, UPC-E, EAN-8, EAN-13, QR Code, RSS-14, RSS Expanded, Data Matrix, Aztec, PDF 417, Codabar, ITF, Codes 39, 93, and 128. The ZXing library also includes barcode scanning options that we're not going to cover in this tutorial. You can check the project out at Google Code for more info.
4. Retrieve Scanning Results
Step 1
When the user clicks the scan button, the barcode scanner will launch. When they scan a barcode, it will return the scanned data to the onActivityResult method of the calling activity. Add the method to your main activity class.
Back in the if block, let's find out what data the scan returned. The Intent Resultobject provides methods to retrieve the content of the scan and the format of the data returned from it. Retrieve the content as a string value.
Now your program has the format and content of the scanned data, so you can do whatever you want with it. For the purpose of this tutorial, we'll just write the values to the Text Views in our layout.
1
2
formatTxt.setText("FORMAT: "+ scanFormat);
contentTxt.setText("CONTENT: "+ scanContent);
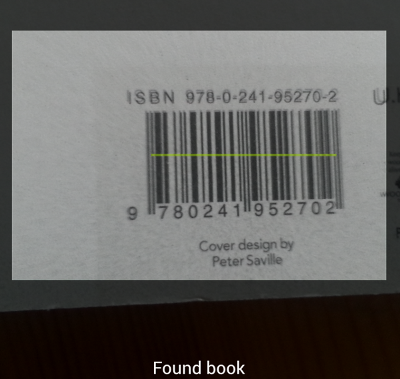
Run your app on a device instead of an emulator so that you can see the scan functioning. Try scanning a book or any other barcode you might have.